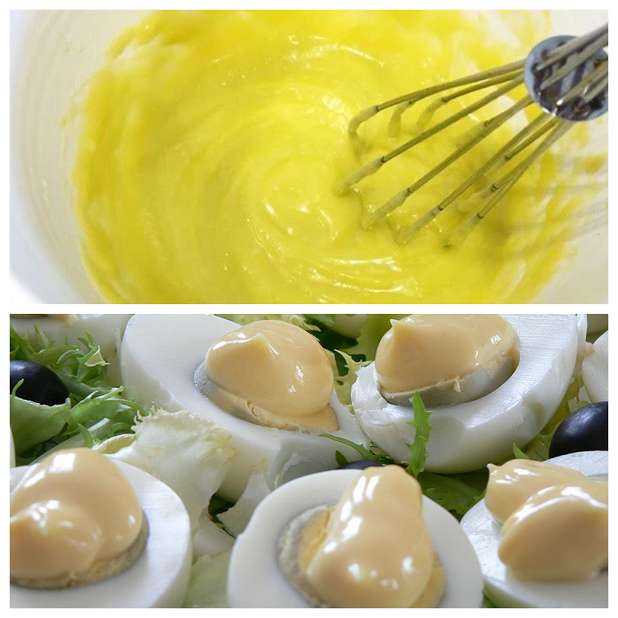
Blog posts tagged with 'foodie'

OEUF MAYONNAISE
Happy spring! With Easter this weekend and Passover in April,  there are bound to be an abundance of fresh and hardboiled eggs gracing our kitchens.  For me, the egg is golden --it can be a valuable part of a recipe and it can be the recipe all on its own.
In the words of Oscar Wilde,
"An egg is always an adventure; the next one may be different."
 
In France, one of my favorite dishes is the very classic oeuf mayonnaise.  What makes it fabulous is the homemade mayonnaise dribbled over the top of the egg-- not mixed into the yolk.  This dish is considered somewhat old-fashioned by some, but there is a movement (so French!) in Paris to bring it back.  Claude Lebey, the doyen of restaurant critics, has founded ASOM (Association for the preservation of the Oeuf Mayonnaise).  The French take their food quite seriously! Here are Monsieur Lebey's suggestions on making the perfect hardboiled egg to be enjoyed underneath a cover of mayonnaise:
1) Start cooking the egg in fast boilingsalted water
2) The perfect cooking time is 9 minutes
3) Stop cooking 30 seconds before the finish time so the yolk is still a bit soft.
4) Always enjoy a glass of champagne with this dish--it goes perfectly.

On your next trip to Paris, here are Lebey's ASOM Prize winning restaurants for Oeuf Mayonnaise:  Chez Flottes, Brasserie L'Evasion, L'Auberge D'Chez Eux.
In the meantime, pour yourself a glass of champagne and have fun making the perfect hardboiled egg and homemade mayonnaise! Cheers! 

CARLA'S MAYONNAISE

Ingredients: 


2 egg yolks and 1 whole egg (organic)
1 tsp dijon mustard
2 Tablespoons lemon juice
1/2 teaspoon salt
2 cups high quality olive oil

Preparation: 

Put everything but the oil in a food processor for 10 seconds until creamy.  With the processor running, add your oil SLOWLY—droplets at a time!  It should be very thick. Once you have added 1 1/2 cups of the oil, stop the machine and check for thickness and taste. If it is too thick, add drops of lemon juice or continue to slowly add oil.  When I'm feeling extra ambitious, I make this using a bowl and a whisk (and some elbow grease!).

Keep refrigerated and use within 1 week. May be flavored by adding chopped herbs, roasted garlic,spices, or anything you can dream up.

SECRET: Make sure all ingredients are at room temperature to start and remember that patience is a virtue! 


xx Carla 


I was born in the spring of the late 1950's.  Ventura was a quiet southern California beach town then and our lifestyle was a modest one. I grew up feeling that I had everything I needed-- especially so on Sunday nights-- deemed pie night,  in our home.  The anticipation of knowing what pies my mother Dorothy and family friend, Marion would make was my favorite guessing game. Life was simpler then!  


My mom made everything from scratch; her pies, our meals and our clothes.... it seemed effortless! I know now that it wasn't but it certainly gave me a sense that everthing was possible if I applied myself. To this day, I get a thrill when I make something from nothing. Whether it be a necklace made from unlikely combinations of found parts or a recipe recreated with whatever is leftover in the refrigerator, a bit of imagination and time can produce something special.  I find there to be a bit of magic in all of this! 


CARLA'S FLAKY PIE CRUST

This is a crust I make in a food processor. It’s easy and pretty foolproof!  On Sunday Pie Night, I learned that the secret to a good crust is to have everything very cold and to handle it as little as possible.

Ingredients for one  9" pie crust
1 1/2 cups all-purpose flour or Cup4Cup Gluten free flour
1 1/2 sticks cold butter, cubed
1/4 teaspoon salt
1/3 cup  ICE water

 Measure the flour into the processor with the regular blade attached. Add the unsalted butter, cut into cubes (should be frozen or very cold). Add salt. Process for 5 seconds. (the butter should still be in pieces)

Add the ice water and process for 5 seconds longer, just until dough comes together. Don’t wait until it is a big clump or it will be too wet and tough.

 Remove the dough and gather it into a ball with your hands (squeeze it a bit to make it stick together). Place a piece of wax paper (lightly dust it with flour and lightly flour your rolling pin) over a wood board or clean surface and roll the dough into a 16-18 inch circle to 1/16-1/8 inch thick. Place this dough (on the wax paper) into the fridge for about 20 minutes maximum. When you are ready to put it in your pie dish, place the pie dish on top of the dough, turn it over and then gently peel the wax paper off the dough .  Pat it gently into the pie dish and crimp the edges.

Note: If you find yourself without a proper rolling pin, I find that a chilled vodka bottle will do the trick just fine!  A quick shot before rolling out the dough is known to boost confidence!


xx Carla


camillek logo


CAMILLE K is most definitely a jewelry brand so why a post about food?  If you follow us on Instagram, you will see frequent photos of food and the #cookingwithcarla hashtag.  Some of you have asked for the recipes and we have listened!


Cooking is a creative process -- especially so when you are willing to NOT follow the recipe and trust your instincts.  In the same vein of knowing what gem colors go together when I'm designing a new piece of jewelry, deciding what spices will complement a recipe I'm working on requires a similar sensibility.  And of course, there is the visual aspect of designing and cooking that is so appealing to me.  Jewelry tries to capture the wearer's interest with both beauty and comfort. Food attracts the eye of the diner and delights his/her palate.  Both should make every effort to stir  one's heart! 
   
I hope you will enjoy preparing and sampling some of my personal favorite recipes both sweet and savory!  If you know me, you know I love a good story. Here are Kate's three rules to live by for you to ponder as you bite into your first brownie: 

 
1- Never quit!
2- Be yourself!
3- Don't put too much flour in your brownies!
 
KATE'S BROWNIE RECIPE
 
1) Preheat oven to 325 degrees
2) In a heavy saucepan over very low heat, melt 2 squares  Guittard unsweetened chocolate and 8 Tbsp. organic butter.
3) Remove pan from heat and stir in 3/4 cup sugar. ( I often change to honey)
4) Beat in 2 organic eggs and 1/2 tsp. vanilla
5) Quickly stir in 1/4 cup flour (I use Cup4Cup gluten free flour), and 1/4 tsp. salt
6) Spread batter in a well-greased 8x8" baking pan. Bake 40 minutes. Remove, cool, cut and be delighted!
 
 
 XX Carla